Thursday, December 6, 2012

Chandrakala (Stuffed Sugar-coated Pastry)

Chandrakala, sounds so similar to 'Chandrakanta' and thus takes me to the golden era of Doordarshan Cinema, those Sunday morning specials, the 'Jungle Book', ' The Ramayana', ' The Mahabharat' and then this color-blasted catchy story of the beautiful  princess 'Chandrakanta'. Though Chandrakanta has nothing to do with Chandrakala, except for the fact that both of them are surprisingly enticing. 

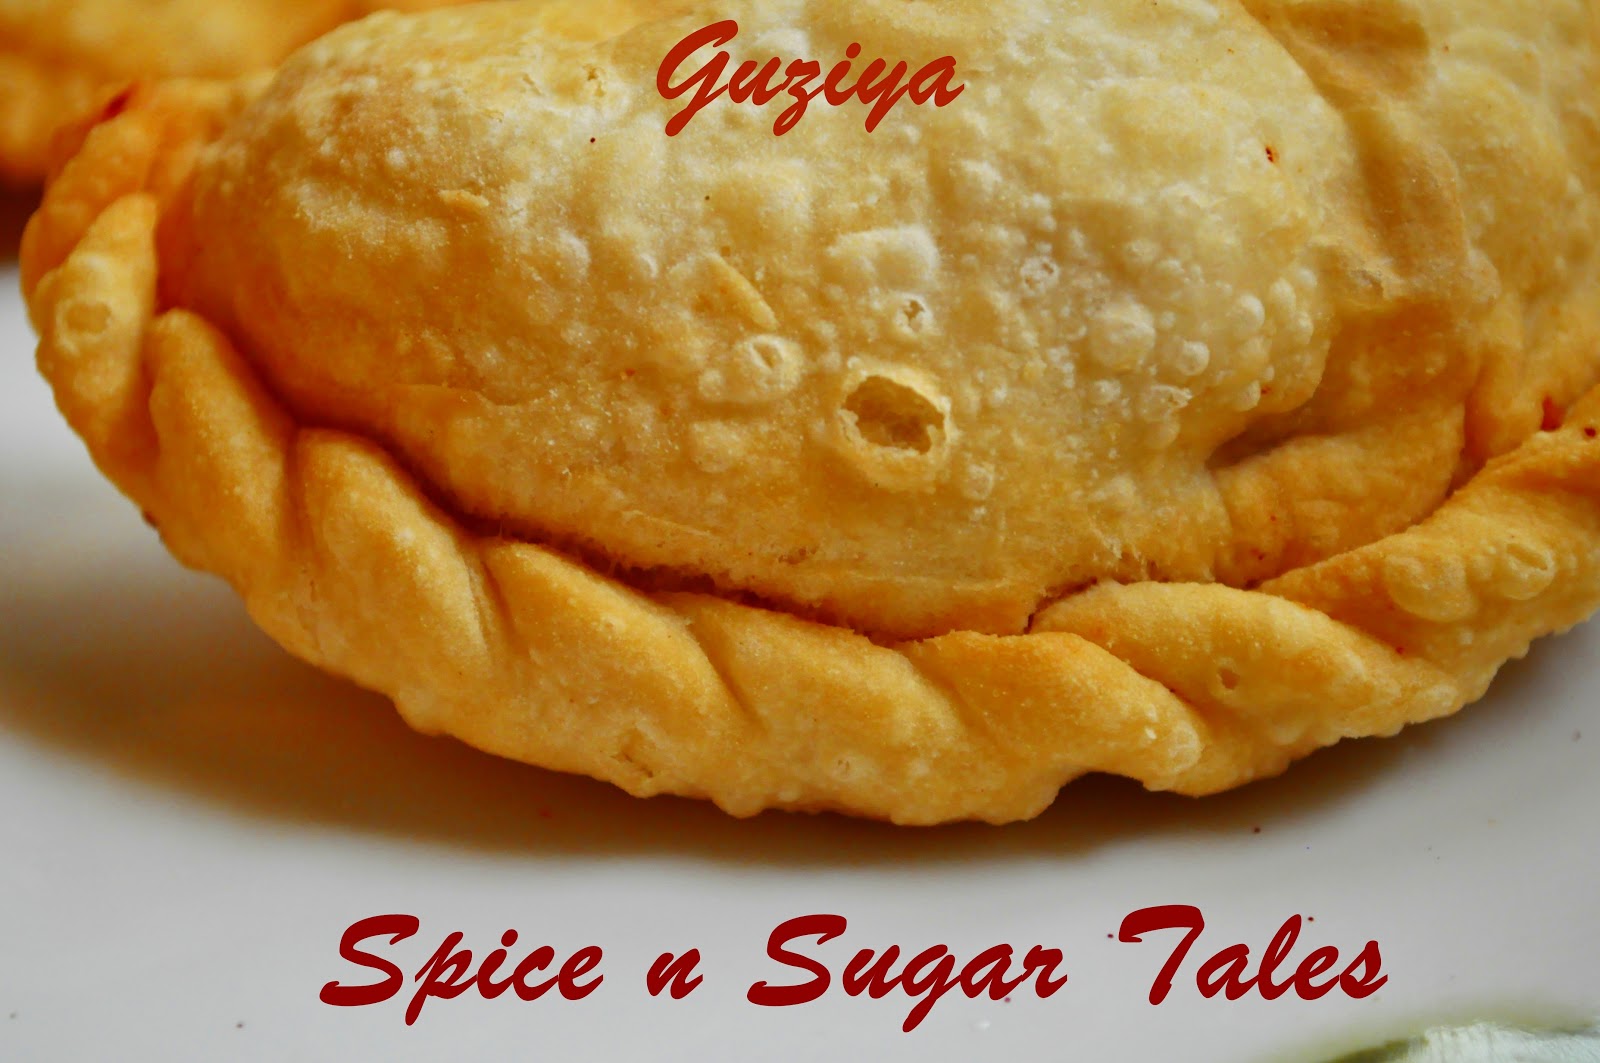
Well, I had my first encounter with this dainty delight some 3 years back when I saw it sleeping beside guziya in a sweet shop. It looked like guziya, but was roundy-round, and then had that shiny lustre to flaunt its beauty along with the lovely curls on sides. I was gazing at it with so much love and that day I thought that would try this for sure someday. Years passed in a flash of light and suddenly I went back to the memory lane, recalling this sweet and decided to make this for Diwali. I had no idea about how to turn it on sides and seal it, but had firm determination to give a try at least, and if it would not work, then I would switch to my regular guziya moulds and use up the mixture there. By God's grace, I learned to turn it after 3 unsuccessful trials. In the beginning, I didn't know how to go about and was trying to seal the edges with distant turns, but in the next two trials, the trick just clicked and I reached the moon (with no help from any videos o you tube! :P). 

CHANDRAKALA

Preparation Time: 30 minutes
Cooking Time: 30 minutes

Ingredients:
For the Pastry:
1. Maida/ All Purpose Flour: 3 cups
2. Ghee/ Clarified Butter: 1/2 cup (for the dough)
3. Warm Water: for preparing dough
4. Ghee/oil: for deep frying

For the Filling:
1. Khova/ Mava/ Reduced Milk: 200 gms
2. Powdered Sugar: 1/2 cup or as per taste
3. Chironji: 2 tbs
4. Almond flakes/bits: 1/4 cup
5. Raisins: a handful (optional)
6. Cashew Nuts: a handful (optional)
7. Grated coconut: 1/4 cup (optional)
8. Elaichi/ Cardamom Powder: 1 tbs

For the Sugar Syrup: 
1. Sugar: 3 cups
2. Water: 1 cup

 Method:
  1. For preparing the dough, take the maida/APF in a bowl and add ghee to it. Mix well with your fingers till you get a crumbly structure. Take a handful of flour and press it hard in your fist; now rest it slowly on the loose flour and see if it can still keep up its shape. If the flour loosens immediately and falls apart, then you need to add a little more of ghee. The ghee should be enough to loosely bind it.
  2. Now add warm water to prepare a soft dough (like that for poori). 
  3. Cover it and let it rest for 20 minutes.
  4. For the filling, take the khova/ mava in a heavy bottomed pan and heat it.
  5. Keep moving the laddle continuously to avoid any sticking at the bottom. 
  6. The khova will become loose on heating and will start melting. Keep stirring till it becomes slightly golden and starts leaving the edges of the pan.
  7. Take it off fire and let it cool.
  8. Once it has cooled down, add the powdered sugar, dry fruits, cardamom powder and grated coconut to it. 
  9. The mixture might be slightly sticky if the khova has not dried well, but that will hardly make any difference in the taste. 
  10. Keep the mixture aside.
  11. In the meanwhile, when the khoya is cooling down, prepare the sugar syrup. 
  12. Take 3 cups sugar and 1 cup water in a heavy bottomed wok/ vessel and take a boil with frequent stirring to dissolve the sugar completely . Simmer for 2 minutes and leave it warm.
  13. For preparing the pastry, divide the dough into 20 equal parts and make small balls out of them. Also, divide the khova mixture into 10 equal parts and make small balls with each of them.
  14. Now take two dough balls and roll them separately like small pooris.
  15. Place one poori on a flat surface and place the khova ball in the centre of it. Wet the rim of the circle with some water using your fingertips. Now place the other poori over it to cover it completely. 
  16. Now the main trick lies in curling and swirling the edges to give the perfect shape. Press the entire rim gently with your fingers to merge the two pooris or circles. Now start turning/bending the rim within, with each turn getting over the prior one, and thus making a chain like structure. This art of bending and twisting will come with time and practice, so have patience in your first go. It took 10 minutes for me to understand and figure out how to bend accurately, but then it just came automatically. 
  17. Once the whole structure is well bound and locked, keep it aside, covered with a wet cloth. Stuff 3-4 pastries at a time and then start frying.
  18. In the meanwhile, keep the ghee/oil for heating. The ghee should not be fuming hot neither cold. It should be be just right, that is when a part of dough is immersed, it should rise up immediately but not turn brown.
  19. Keep the flame on medium-low, and slide the pastries in the ghee. Deep fry them on both the sides till they become golden.
  20. Sieve them out and immediately immerse them in the warm syrup. Take them out after 30 seconds and carefully place them on a plate in a vertical position, so as to let the excessive syrup drain out.
  21. If the sugar syrup has become too stringy, white and crystalline, then warm it again with a few drops of water.
  22. The perfect syrup will always give a shine, while the overdone one will turn white.
  23. Let the sweet rest for 30 minutes, so that the syrup coating can dry up. 
  24. Serve with some almond flakes and loads of love. :)
 
 
Suggestions:
  1. The khova/mava should be fresh, else the whole sweet will get spoiled.
  2. You can always keep the filling as sweet as you want. Since the pastry is already sugar coated, so I preferred keeping the filling mildly sweet. 
  3. The dry fruits can be of your choice. If you wish to store this sweet for more than 2 days, then avoid using raisins and fresh coconut.
  4. Avoid refrigerating, else the outer crust will go soggy.
  5. It's always better to finish off khova sweets within 2 days else they need refrigeration, and then the crust doesn't remain the same crunchy. 
  6. You can also make guziyas with the same filling and dough; just that the sugar syrup coating is not required there. 
  7. If the sugar syrup is too thin, then it will not dry up and thus the sweet will stay slightly sticky, and if it is too thick and crystalline, then it will go all white white and flaky, so make sure you prepare the perfect syrup. Anyway, it will still be delicious. :)
  8. Don't keep the rolled dough too thin, else it will break on bending and curling. 
  9. Chandrakala generally has a thicker crust than Guziya.

Wednesday, November 7, 2012

Guest Post for Nupur: Kesar Badam Pista Kheer

Addiction is in nerves, not only for sweets as Diwali is approaching, but for blogging as it gives a food blogger that vigor and charm to bewitch the foodie world. This time I'm writing with immense love for a vivacious girl who blogs in a happening way at UK, Rasoi and Me. She is one of my favorite bloggers who lures with her beautiful writing skills and then those breath-taking pictures. I'm delighted to bring in this Kesar Badam Pista Kheer recipe for her 'Be My Guest' series. 
Get to her fantastic blog for utterly-butterly recipes to tempt your mind and entice your taste buds. 


For the recipe of this delicious-looking kheer, please make your cursor run on this link.

Monday, October 8, 2012

Chatpati Palak Patta Chaat (Spinach Fritters)

How many of you count on calories before picking up the kitchen ladles and jars for trying out a new recipe? Well, for sure I'm not the one. I hardly think about the calories, the fat content, the sugars and carbs when I'm in a mood to try out a recipe. Though I'm a doctor and this is quite contradictory to how my behavior should be, but who says doctors don't have diabetes or hypertension. Jokes apart, I believe in eating good, and good here means something that is soul-satisfying.
Now this recipe here on this page is pretty close to my heart and tongue both, because it has been reigning these two for years. How can I forget the first time I saw this and had love at first sight. (My hubby was surely jealous about this! :P) That was the first time ever I had heard of something like that, I mean a 'Chaat' with 'Palak'!! Since then, I've been wanting hard to make this but don't know what was keeping me aback. Finally when I made this a couple of days back (You know how lazy am I not to post things on time!), I was almost on cloud nine, before even tasting it and getting remarks from my better loving half. As usual he said 'acchha hai', with his mind completely engrossed in some stupid cricket match, and hardly giving his taste buds the chance to relish something as great as this. Anyway, men are finally men, so I moved forward with my own bowl and skipped my dinner that evening because of this chatpati chaat (I'm sure many of you can do that! ;))


CHATPATI PALAK PATTA CHAAT

Preparation Time: 20 minutes
Cooking Time: 15 minutes
Makes 10 Servings

Info Meter:

  • Spinach is an excellent source of many vitamins and minerals, especially folic acid.
  • Spinach is not only great for women, children and growing teens, but it can slow the age related decline in brain function and has anti-inflammatory properties.
  • During the First World War, wine was fortified with spinach juice and given to French soldiers weakened by hemorrhaging.
  • It is always advisable to cook the spinach than consuming raw spinach.
Ingredients:
For Palak Pakoda/Fritters:
1. Palak Patta/ Spinach Leaves: 10
2. Besan/Gram/Chickpea Flour: 1 cup
3. Water: 1 cup + 2 tbs
4. Salt: 1 tbs or as per taste
5. Turmeric Powder: 1/2 tsp
6. Jeera/Cumin Powder: 1/2 tsp
7. Red Chilli Powder: 1 tsp
8. Coriander Powder: 2 tsp
9. Garam Masala: 1/4 tsp (optional)
10. Asafoetida/ heeng: a pinch
11. Oil: for deep frying

For Chaat:
1. Spicy Green Chutney
2. Sweet Tamarind/Imli Chutney
3. Bhel Ki Sev
4. Anaar/ Pomegranate Seeds


Method:
For Palak Pakoda/ Fritters:
  1. Clean the palak/spinach leaves with water and pat them dry. Be careful not to break them.
  2. If the leaves are too big, cut them into two halves each.
  3. Now prepare the batter by adding the besan/gram flour with all the spices and water.
  4. Add water slowly and keep mixing continuously so as to avoid formation of lumps.
  5. When the batter reaches ketchup-like consistency, stop any further addition of water.
  6. Heat some oil in a pan.
  7. Check if it is properly heated by dropping a small portion of the batter and notice if it immediately rises up and starts floating. If so, the oil is ready.
  8. Now carefully take one leaf/patta at a time in your palm. Coat it with the batter on both the sides and slide it smoothly in the hot oil.
  9. Flip over after a minute and see that both are sides are well fried and are golden brown.
  10. Take it out and drain any excess oil on a kitchen tissue. 
  11. Fry the leaves one by one after coating them with the batter.
  12. Do not keep them aside for cooling as this chaat is enjoyed hot and crisp.

Assembling The Chaat:
  1. Now take one crisp spinach leaf/ palak patta and smear it lightly with spicy green chutney and tamarind/imli chutney.
  2. Shower some pomegranate/ anaar pearls over it and finally ornament with bhel ki sev.
  3. Serve immediately else the leaves will so soggy and soft.
Suggestions:
  1. You can also add 2 tbs of rice flour to the batter to make the fritters even crispier.
  2. Adjust spices as per your taste.
  3. This dish is not meant for storing and keeping, rather make it and finish it at one go.
  4. It always tastes heaven when served immediately so that the leaves stay crisp.
  5. You can also add chopped onions and tomato to the chaat while assembling.
  6. If the batter is too thick, the leaves will have a softer and thicker coat, but if it too runny, the batter will all scatter in the pan, so make sure the consistency is right.

Friday, September 28, 2012

'Dive in Five' Homemade Pizza

Yippieeeee Yuppieeee Happieeeeee..... all emotions shrilling with exaltation as I bake my First Pizza with the base as well. In India, I guess 60% people who are 'Pizza-buffs' try baking them at home using the bakery-baked Pizza bases. And how can I forget the way we used to freak upon trying all variations and hit-or-miss toppings on that pancake sized chhotu sa Pizza base. Believe it or not, but the best Pizza to me would always be the Sukhadia Circle wala 'Desi Pizza' with no mozarella cheese, rather processed cheese grated on the top with desi tomato gravy to line. Those days were different; the gust of wind waving the hair and dabbing the cheeks as we rode on Kinetic Honda, staring at all dolled up people taking over our bike, and that free-bird feel that filled the blood with Endorphin, the happy hormone. I still remember the posture in which I would spread my arms like feathers, sitting at the back, next to my darling sis, and feeling those fresh vibes and energy passing through during the ride (though this was occasional; especially done when there was no one on the road to watch such freaks!! :P)
Huuuh, so now it's time to come back to the real world, out of my fantasies and dreams, but yeah, I definitely will do that again with my daughter at least once after she starts riding. :)
Now this Pizza thing actually took my brain to all directions, from creativity to copying, and from experiments to experience. I almost used everything when I made this first Pizza of mine. I copied the basic ingredients and procedures from various sites, jeweled it with some creativity, experimented with multi-grain flour in the next go, and used the earlier experiences on baking to see that the experiment doesn't fail, and when you are this organized and focused, nothing in this world can stop you from reaching the goal. The outcome was flabbergasting! :)
As always, my brain cells were struggling hard to find a good name for the recipe, and finally I settled on this 'Dive in Five' Homemade Pizza because the topping had five major ingredients to fill it with taste and glamor. 

'DIVE IN FIVE' HOME-MADE PIZZA:

Preparation Time: 20 minutes
Dough Rising Time: 1 hour
Baking Time: 15-20 minutes
Makes 2 Pan Pizzas

Ingredients:
 For the Base:
1. Maida/APF: 3 cups
2. Dry/Instant Yeast: 1 and 1/2 tsp
3. Warm Water: 1 cup
4. Sugar: 1 tbs
5. Salt: 1 tsp
6. Olive Oil: 2 tbs + for greasing, smearing and dabbing
7. Cling Film for wrapping

For The Tomato Gravy:
1. Ripe tomatoes: 2 (blanched and pureed)
2. Onion: 1 (finely chopped)
3. Garlic Pods: 5 (medium sized, finely chopped)
4. Olive Oil: 2 tbs
5. Salt: 1 tsp or as per taste
6. Black Ground Pepper: 1 tsp
7. Tomato Ketchup: 2 tbs
8. Oregano: 1 tsp

For the Topping: 
1. Mozzarella/ Pizza Cheese: 200 gms
2.  Tomato: 1
3. Onion: 1
4. Olives: 8
5. Capsicum: 1/2
6. Paneer: 50 gms
7. Oregano
8. Chilli Flakes (optional)


Method:
For the base:
  1. Take 1/4 cup warm water (the bowl/cup should be warm as well) and add sugar to it.
  2. Now sprinkle the dry yeast over it and let it foam, say for about 10 minutes.
  3. On the other hand, sieve the flour, add salt and oil to it and mix.
  4. Make a well in the centre of the flour and add warm dissolved yeast to it.
  5. Start kneading and prepare a soft dough with it using the remaining warm water. 
  6. The consistency should match that of the dough used for poori/chapathi.
  7. Remember, the dough will loosen and soften after fermentation, so don't keep it very soft. 
  8. Dab your hands with some oil and keep kneading till it goes smooth. Smear the dough with a little oil.
  9. Now place this dough in a greased bowl and cover with a cling film.
  10. Keep this bowl in a warm place (either in sunlight, or in an oven with lights on, or in a bigger bowl of warm water)
  11. The dough will rise to double in an hour. If not, check with the temperature again and keep for some more time.
  12. Now take the dough and punch it down.
  13. Divide the dough in two equal parts and keep the other part covered while working with one.
  14. Take one part of the dough, make a ball and roll it with a rolling pin. Keep the size of the circle slightly bigger than the size of the base of the pizza pan.
  15. If you want, you can stretch the dough using your palms and fingers, too, and thus avoid rolling with a pin.
  16. Now place this rolled dough in the base of the pan and stretch with your hands on all sides to fit in it.
  17. The dough should be stretched up high till the upper rim of the pan.
  18. Dab the base with your fingers so that it doesn't puff on baking.

For the Gravy:
  1. Blanch the tomatoes, peel off and puree them.
  2. Take oil in a pan and heat it.
  3. Add chopped onions and garlic to it and saute till they turn translucent.
  4. Now add the tomato puree followed by the salt, pepper.
  5. Cook for 5 minutes and then add tomato ketchup and oregano.
  6. The gravy is ready to use. Make this during the dough-rising time.
For the Topping:
  1. Cut onion, tomato and capsicum in medium sized pieces.
  2. Cube the paneer and take a boil for them to soften.
  3. Slice the olives into rings.
  4. Divide the cheese cube into two for the two pizzas.
Assembling the Pizza:
  1. Pre-heat the oven at 230 degrees Celsius for 15 minutes.
  2. Now take the pan with the dough sitting in it.
  3. Coat the base with half of the tomato gravy.
  4. Now grate half a cube of the mozzarella cheese over the gravy and spread vegetables and olives over it.
  5. Now grate the remaining cheese over the veggies and sprinkle some oregano and chilli flakes.
  6. Transfer this pan to the pre-heated oven and bake for 15-20 minutes till the top browns.
  7. Take it out and carefully lift the pizza out of the pan.
  8. Cut it into pieces and serve oven-hot with some ketchup and chilli flakes.

Suggestions:
  1. The rising of the dough is the most critical here. I hear many friends complaining that their dough didn't rise well and hence the whole experiment crashed.  My suggestion to them is to check with the yeast they are using first because it could be old or not good enough. Secondly, the temperature for rising matters a lot. If you keep the dough in normal temperature, it might not rise especially in winters or rain, so try keeping it either in an already warmed/heated oven for rising or in a warm bowl of water.
  2. You can always play with the base of the pizza. The base could be made 'thin crust' if you keep the dough thin, and this can be made 'deep dish' if you pull the dough high till the upper rim of the pan. 
  3. Also, you can make instant thin crust multi-grain pizza without fermentation, just by using more oil like how we keep for Samosa Dough. I tried this and it came out really well, and will post this sometime later for sure.
  4. The gravy get vary as per your taste. I even tried with coriander chutney to smear on the base and it was yummilicious.
  5. The toppings can go as creative as your mind goes. You could pop in some mushrooms, jalapeno, corn, red bell pepper or other veggies that you love to eat.
  6. Do not overheat. As soon as the top browns a bit, take the pan out of the oven.
  7. My pizza was baked in about 15 minutes. The oven timings may vary according to the type of oven you are using. 

The recipe flies off to:
My event: Cooking Made Easy With Cheese/Paneer
Bake Fest started by Vardhini guest hosted by Archana  

Wednesday, September 26, 2012

Choco Banana Walnut Loaf


I have been wanting to post this recipe for about a week, immediately after I baked it, but sometimes time and sometimes your inner soul just don't tune well and thus was this delay. I baked this 'first ever loaf' of mine on the last Tuesday when I was expecting some guests for lunch. Along with these cake delights was my first time attempted home-made pizza and then some braided breads on choice. Everything turned out olympian and I was in such an ecstatic mood. I thought to post it the very next day but had some corporate sessions to take over and thus had to sit back for a while. Now before my daughter wakes up from her fairy-tale sleep, I need to complete this and vroooom....publish it! :)

CHOCO BANANA WALNUT LOAF:

Preparation Time: 10 minutes
Baking Time: 25-35 minutes 
Makes one big loaf that can be gulped down the throat in less than a day! ;)


Info Meter:
  • Walnuts are rich in monounsaturated fatty acids (about 72%) like oleic acid and an excellent source of all important omega-3 essential fatty acids like linoleic acid, alpha-linolenic acid (ALA) and arachidonic acids. Regular intake of walnuts in the diet helps to lower total as well as LDL or “bad cholesterol” and increases HDL or “good cholesterol” levels in the blood.
  • Eating just as much as 25 g each day provides about 90% of RDI (recommended daily intake) of omega-3 fatty acids. Research studies have suggested that n-3 fatty acids by their virtue of anti-inflammatory action help to lower the risk of blood pressure, coronary artery disease, strokes and breast, colon and prostate cancers.
  • Store walnuts in your refrigerator for up to 6 months or in your freezer for up to one year, and away from foods with strong odors (e.g. fish, cabbage, onions). Nuts can absorb the flavors of other foods.  Heat causes the fat in walnuts to change structure, which creates off odors and flavors. Fresh walnuts smell mildly nutty and taste sweet.
  • Walnuts are the oldest tree food known to man, dating back to 7000 B.C. The Romans called walnuts Juglans regia, “Jupiter’s royal acorn.


Ingredients:
1. APF/ Maida: 2 and 1/2 cups
2. Sugar: 2 and 1/4 cups
3. Banana: 1 (robust)
4. Cocoa Powder: 1/2 cup
5. Butter: 3/4 cup
6. Eggs: 3
7. Warm Milk: 1/4 cup
8. Baking Powder: 1 and 1/2 tsp
9. Baking Soda: 1/2 tsp
10. Vanilla Essence: a few drops
11. Chopped Walnuts: A handful
12. Salt: a pinch
13. Butter/oil for greasing or cooking spray


Method:
  1. Take the Maida/APF, baking soda, baking powder and salt in a bowl and mix them well.  Divide this mixture into two equal parts.
  2. Take the first part and sift it with cocoa powder. Keep the second part as it is and sift it separately.
  3. Grease and dust the loaf tin and keep it aside.
  4. Pre-heat the oven on 180 degrees Celsius for 10 minutes.
  5. Take the butter and beat sugar with it till it goes light and fluffy. Do not melt the butter, rather keep it at room temperature.
  6. Beat the eggs separately and blend them well with the sugar butter mix.
  7. Peel off the banana and pulp/blend it to a fine puree. 
  8. Now divide the sugar-butter-egg mix into two equal parts.
  9. Take the first part and  fold in the cocoa-flour, applying the cut and fold method. 
  10. Make sure you get a ribbon consistency while folding it. If you find the batter thick, adjust it with addition of milk.
  11. Now take the second part of the sugar-egg-butter mix and add banana pulp, vanilla essence to it followed by the folding in of second part of the flour/maida without cocoa powder in it.
  12. Chop the walnuts, coat them in maida and mix them gently with both the batters separately.
  13. Now transfer the banana mix/batter into the greased loaf tin followed by pouring in the cocoa mix/batter over it gently.  
  14. Now run a fork gently into the batter in a wave fashion, slightly blending the two different batters. This will help give a marble look/ wave pattern to the loaf.
  15. Now bake this on 180 degrees for 30-35 minutes.
  16. Check the loaf after 30 minutes by seeing if the cake edges have left the corners; if so, then insert a tooth-pick at the center and see if it comes out clean. When this happens, your loaf is ready.
  17. Take the tin out and let it cool for 10-15 minutes. Once it has cooled down, invert the loaf on a plate, making sure it doesn't break.
  18. Slice it smooth and enjoy just like that.


Suggestions:
  1. Always cut and fold the mixture in a single direction. Cutting and Folding is nothing but mixing the cake in a circular fashion (like how you make a circle) and then cutting this circle into half and again circling. 
  2. Do not invert the loaf before it cools down else it would break. Mine was too soft and spongy and I actually couldn't wait to slice it.
  3. Do not over-bake else the chocolate will burn, and the cake will become hard, too.
  4. It can be stored for 2 days in a cling wrap that doesn't allow it to turn hard even in the refrigerator. Do not keep it outside for long.
  5. Walnuts can be replaced with the nuts of your choice. 
  6. You can adjust sugar as per your taste. You can add some extra sugar to the cocoa mix as well.
  7. If you wish, you could mix the cocoa and banana together and have a uniform loaf. 


This loaf takes off to:
Bake Fest started by Vardhini guest hosted by Archana  
Show Me Your Dessert  by Pari Cash

Friday, September 14, 2012

Cocoa Choco Mini Bites

 One fine day, I stepped into a local kitchen-ware shop to buy some regular steel stuff and unknowingly chanced on these tiddly cute looking moulds. My eyes literally got struck there and I didn't know how to pull my nerves back. I asked the shopkeeper for what they were, and he replied, 'These are aluminum moulds for making sweets'. My first reaction to this was 'wow'! And the next thought to win my brain was that I could use them for making small tarts, chaat papdis and then of course these tiny cake bites. I had been waiting for days which felt like ages, just to bang on these moulds and give my experiments a go-green signal. Finally the day came and I settled on baking some coffee chocolate based mini cake bites. They came out perfect with the coveted texture, the sensuous appeal, and the liberated aroma sought for. I ornamented them with some Hershey's Chocolate Sauce and scrumptious they went. 

Cocoa Choco Mini Bites

Preparation Time: 10 minutes
Baking Time: 15-20 minutes
Makes 8 tiny bites

Info Meter:
  • Cocoa beans are the fruit of the cacao tree. Cocoa beans are called cocoa beans and not cacao beans due to a spelling mistake made by English importers in the 18th century when chocolate first became popular.
  • Chocolate is made by grinding the kernels of cocoa beans to a paste called chocolate liquor. This is hardened in moulds to make chocolate.
  • Cooking chocolate is bitter. Eating chocolate has sugar and, often, milk added.
  • Cocoa powder is made by squeezing the cocoa butter (fat) from chocolate liquor and then pulverizing it.
  •  It takes about 400 beans to make a pound of chocolate.
  • Cocoa and chocolate are rich in minerals that the body needs, including magnesium and iron. 
 

Ingredients:
1. APF/ Maida: 1/2 cup 
2. Powdered Sugar:  1/2 cup
3. Cocoa Powder: 1/4 cup
4. Coffee: 1/2 tsp
5. Butter: 1/4 cup
6. Baking Powder: 1/2 tsp
7. Baking Soda: 1/4 tsp
8. Egg: 1
9. Warm Milk: 2 tbs
10. Salt: a pinch
11. Walnuts: a handful
12. Hershey's Chocolate Sauce
13. Butter/oil for greasing or cooking spray 

Method:
  1. Sift the maida/all purpose flour with the cocoa powder, coffee, baking Powder and baking soda/Eno.
  2. Grease and dust the baking tin and keep it aside.
  3. Pre-heat the oven on 180 degrees Celsius for 10 minutes.
  4. Take the butter and beat sugar with it till it goes light and fluffy. Do not melt the butter, rather keep it at room temperature.
  5. Beat the egg separately and blend it well with the sugar butter mix.
  6. Now fold in the flour, applying the cut and fold method.
  7. Make sure you get a ribbon consistency while folding it. If you find the batter thick, adjust it with addition of milk.
  8. Chop the walnuts and mix them gently with the batter.
  9. Now transfer this mixture into the greased tiny moulds and bake them on 180 degrees for 15-20 minutes.
  10. Check the cake bites after 15 minutes by seeing if the cake edges have left the corners; if so, then insert a tooth-pick at the center and see if it comes out clean. When this happens, your cake bites are ready.
  11. Take the moulds out and let them cool for 10-15 minutes. Once they have cooled down, invert the mini cocoa bites on a plate, making sure they don't break.
  12. Decorate them with chocolate sauce and go as creative as you can.
  13. Before you grab a piece, make sure it is warm; warm cocoa bites are the yummiest. :)

Suggestions:
  1. Always cut and fold the mixture in a single direction. Cutting and Folding is nothing but mixing the cake in a circular fashion (like how you make a circle) and then cutting this circle into half and again circling.
  2. Do not invert the cake bites before they cool down else they would break.
  3. Do not over-bake else the chocolate will burn, and the cake will become hard, too.
  4. You can top the yummy bites with chocolate frills or swirls too.
  5. They can be stored for a day or two, but make sure you microwave them for 15 seconds before giving them the permission to enter your mouth. 
  6. In case you don't have small aluminium tart/cake moulds, then you can always use the regular muffin mould. The only difference being that I got 5 different shapes instead of getting the same boring cuppy ones. 
 “Giri Choco” is a japanese custom which means “duty chocolate.” It calls for employees to give chocolates to their managers as a token of loyalty. :)
This post takes off to:

Tuesday, September 4, 2012

Announcing Cooking Made Easy with Chocolates/Cocoa

No words, just silence to speak my heart out this time. All that I want to say right now is a big time 'Sorry' for not doing any justice to my series on 'Cooking Made Easy'  for 3 months, but better late than never, so I'm back with a lovely theme for this month, one that all of you will certainly love. Though it's not valentine's that's approaching, nor is this the chocolate day pumping me to go for it, but definitely there's someone who has a penchant for it and I love him more than chocolates even. :P
Now who else could it be than my Darling Hubby. ( I call him Janu, and these days my 2 year old little cuppy cake has started imitating me by calling her dad the same at times; that is of course funny but she speaks it damn sweetly, better than me even. :)) He is a binge eater when it comes to chocolates or namkeen, so I could not think of any theme better than 'Chocolates' for his birthday month. Also, this month happens to be the birth month of my daughter who is a 100% replica of her father, so all the chocolate recipes received are birthday gifts to my two sweethearts, and I promise, I'll try on each and every recipe whatsoever happens. :D

September's Surprise Ingredient: 
Enticing Chocolates/ Cocoa
  
September 1 - September 30

The rules to participate can be found here.

You can make cakes, chocolates, brownies, tarts, shakes, beverages, choux, pastries, ice-creams, puddings, truffles, pies, custard, yogurt, bars, just anything that has cocoa/ chocolate in it. Get ready to dive in the alluring chocolate pool.

Kindly link your entries using the linky tool below.


Round Up:


1. Chocolate Almond Fudge

2. 2 minutes Chocolate Mug Cake

3. Julia Childs Chocolate Almond Cake

4. Hot cocoa

5. Mocha Snack Cake

6. Decadent Chocolate Fudge Cake

7. Chocolate Chip Cheesecake

8. Eggless Chocolate Sponge Cake

9. Easiest chocolate frosting ever

10. Birthday Chocolate Cake

11. Chocolate-chip Cookie-dough Brownies

12. Choco Pebbles

13. Chocolate Pudding

14. Tiramisu (Eggless Alcoholfree)

15. Cinnamon Hot Chocolate

16. Chocolate Pudding

17. Chocolate Lamingtons

18. Strawberry Truffles

19. Cocoa Choco Mini Bites

20. Eggless Lamingtons

21. Go Nuts With Donuts

22. Cake Truffles and KitKat Crunchies

23. Nutella Chocolate Cake

24. Chocolate Hazelnut Nutella Banana Shake

25. Eggless/ Coke Brownie

26. When Chocolate Meets Yogurt

27. Cadbury Chocolate Cake

28. Ultimate Cream Cheese Cookies

29. Eggless Oreo Cookies

30. Drinking Chocolate

31. Chocolate Oats Bar

32. Tofu Chocolate Pudding

33. Eggless Brownie - Low Fat

34. Eggless Reine De Saba (Queen of Sheba Cake)

35. Italian Dessert

36. Homemade Oreo Cookies : Fauxreos

37. Chocolate Cherry Layer Cake

38. CookieNash -Giant cookies filled with chocola

39. Ultimate Chocolate Cream Cheese Cookies

40. Creamy Chocolate Cupcakes

41. Chocolate Almond Cake

42. Honey Chocolate Cake

43. Choco Banana Walnut Loaf

44. Pecan Fudge

45. Black Bottom Pecan Praline Bars


This linky list is now closed.